 Save
Cornstarch stained-glass crafts are lightweight decorations made from a cooked cornstarch clay, not real glass. When the pieces are rolled thin and colored softly, they catch window light with a frosted, stained-glass effect. This guide shows how to mix, shape, dry, and hang simple hearts, flowers, stars, or seasonal shapes.
Step 1: Matching the flower-mold photo
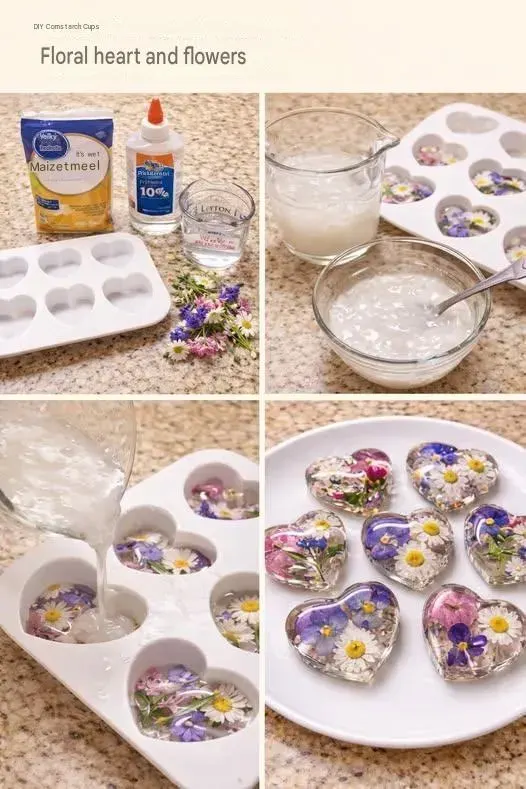
The picture shows colored flower shapes made with a mold and a cornstarch-and-glue craft setup. These are clay-like ornaments, not glass. A thin pale piece may transmit some light, but an opaque flower will not become transparent stained glass. The instructions below describe a cornstarch clay variation; they cannot establish the exact formula or coloring used in the original photograph.
Step 2: Protect the work area before mixing
Cover the table with parchment paper, wax paper, or a washable mat, and set out a saucepan, spoon, rolling pin, cookie cutters, a straw or skewer, and string. If children are helping, choose craft supplies that are clearly labeled for art use; the U.S. Consumer Product Safety Commission explains that consumer art materials should carry ASTM D-4236 conformance labeling when applicable.
Step 3: Cook the cornstarch clay until it thickens
Whisk 1 cup baking soda, 1/2 cup cornstarch, and 3/4 cup water in a saucepan until smooth, then cook over low to medium-low heat while stirring constantly. Cornstarch thickens when heated with liquid; Illinois Extension describes this as starch gelatinization, and a University of Nebraska paper explains that heating starch in water changes the starch granules. Stop when the mixture pulls together like soft mashed potatoes.
Step 4: Cool the dough before handling it
Scrape the warm dough onto parchment and cover it loosely for a few minutes so the surface does not dry out. Once it is comfortable to touch, knead it until smooth and flexible. If it feels sticky, dust the surface with a pinch of cornstarch; if it feels crumbly, knead in a few drops of water.
Divide the dough into small balls and knead a few drops of food coloring into each one. Keep the color pale if you want the finished pieces to catch light, and work on parchment because the UC Merced Early Childhood Education Center notes that too much food coloring may stain some surfaces. For marbled pieces, stop kneading while streaks are still visible.
Step 6: Roll the clay thin and even
Place one tinted ball between two sheets of parchment and roll it to about 1/8 inch thick. Thin pieces look more delicate in a window and dry more evenly than thick ones. Lift and rotate the parchment as you roll so the slab does not stick or stretch.
Step 7: Cut shapes and make hanging holes
Press cookie cutters straight down into the slab, then lift away the scraps and reuse them. Use a straw or skewer to make a clean hole near the top of each shape before drying, leaving enough clay above the hole so it will not tear. Keep tiny finished pieces away from children under 3, since the CPSC lists small parts as a special concern for products intended for that age group.
Step 8: Add gentle texture or pressed details
Lightly press lace, a leaf, a dull pencil tip, or the back of a fork into the surface to add detail without cutting through the clay. Illinois 4-H notes that homemade clay made with kitchen ingredients such as cornstarch can be used to practice simple art shapes and design elements. Keep the texture shallow so light can still pass through the thin areas.
Step 9: Dry the pieces completely before hanging
Move the shapes on their parchment to a flat tray and let them air-dry overnight, then flip them gently and dry the other side. Thin pieces may finish within a day, while thicker pieces can take longer. Woods Hole Oceanographic Institution's cornstarch modeling-clay activity notes that air drying works but takes longer than oven drying.
Step 10: Seal and hang the decorations indoors
When the pieces are fully firm, brush on a thin coat of clear-drying craft glue if you want a slight sheen and a smoother surface. Let the sealer dry, then thread ribbon, yarn, or clear line through the hole and hang the shapes in a sunny window. Keep them indoors, since moisture can soften homemade starch-based crafts over time.
Wrap-Up
The bottom line: keep the dough smooth, use light color, roll the clay thin, and let each piece dry fully before hanging. The result is a simple, low-cost window craft with a soft frosted-glass look.
Frequently Asked Questions
- → Is this real stained glass?
No. This is a cornstarch clay craft that gives a frosted, light-catching effect in a window. It will not be clear like glass, but thin pieces with soft color can look delicate and luminous.
- → Can children help make these decorations?
Yes, children can help measure, tint, roll, and cut the clay. An adult should handle the saucepan, warm dough, oven if used, and small hanging holes.
- → Why did my cornstarch clay crack?
Cracks usually mean the dough dried out, was rolled too thick, or dried unevenly. Knead in a few drops of water before rolling, keep the slab thin, and flip the pieces gently while they dry.
- → How do I make the colors look more like stained glass?
Use only a few drops of food coloring and roll the clay about 1/8 inch thick. Very dark color can make the pieces look flat, and the UC Merced Early Childhood Education Center notes that too much food coloring may stain some surfaces.
- → How long do the pieces take to dry?
Most thin pieces need at least overnight, and thicker shapes may need 24 to 48 hours. Woods Hole Oceanographic Institution's cornstarch modeling-clay activity notes that oven drying is faster than air drying, but air drying works if you give the pieces more time.
- → Do I need to seal the finished pieces?
Sealing is optional, but a thin coat of clear-drying craft glue can help the surface resist handling. These decorations are still best kept indoors and away from damp windowsills.
References
This content was developed and refined using reliable sources.
- https://www.cpsc.gov/FAQ/art-materials
- https://extension.illinois.edu/blogs/simply-nutritious-quick-and-delicious/2022-11-04-good-gravy-you-need-thickening-agent
- https://digitalcommons.unl.edu/foodsciefacpub/118
- https://ecec.ucmerced.edu/node/81
- https://4h.extension.illinois.edu/ways-participate/projects/visual-arts-clay
- https://www.whoi.edu/science/b/people/kamaral/sandclay.html