 Save
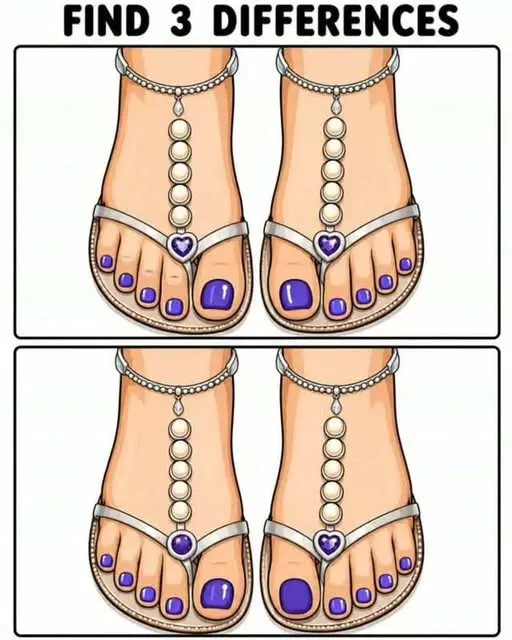
The direct answer: treat the Pearl Sandal Spot-the-Difference Challenge as a three-target comparison puzzle, not a quick guessing game. Start at the ankle bracelets, move down the center straps, check every bead and purple gem, then finish with the toes and outer sandal edges. The verified visual differences for this supplied version are listed below before the general search tips.
The three differences in this exact sandal image
Compare the upper pair with the lower pair. First, the purple jewel at the center of the left sandal changes from a heart to a round shape. Second, the white shine mark on the right big toenail disappears in the lower panel. Third, the ankle bracelet on the right foot loses its small side clasp or loop at the far-right edge. The pearl rows and other nails help you keep the two panels aligned while you check.
What the Challenge Is Asking You to Do
The pearl sandal puzzle shows two similar cartoon-style images of dressy thong sandals on bare feet. Both versions appear to include white straps, pearl-like beads, a delicate center chain, purple gems, polished toenails, and matching ankle bracelets. The goal is to locate three visual details that differ between the two versions. That sounds simple, but the puzzle is designed around similarity: when two images share the same colors, shapes, and layout, small changes can become surprisingly easy to overlook.
A good spot-the-difference puzzle works because it gives you a strong first impression of sameness. Your attention recognizes the overall theme quickly: sandals, beads, purple accents, jewelry, and feet arranged in a neat side-by-side comparison. The missing work is slower. You have to compare parts, not just identify the scene. The American Psychological Association defines change blindness as a failure to notice changes between successive visual scenes, especially when the change is interrupted or not tied to an obvious motion cue https://dictionary.apa.org/change-blindness. A printed or digital puzzle is gentler than a laboratory test, but it plays with the same everyday weakness: we often feel as if we have taken in every detail when we have only taken in the gist.
Why This Pearl Sandal Puzzle Feels Tricky
The sandal artwork concentrates many similar details in a small space. Pearl beads repeat along straps and bracelets. Purple accents appear in more than one place. Curving straps overlap toes and decorative chains. When decorative features repeat, the viewer may group them as a pattern instead of inspecting each one. That is helpful for recognizing the design quickly, but less helpful when the task is to detect one bead that shifted, one gem that changed shape, or one strap that bends differently.
Visual search research gives a useful explanation. A review archived by the National Library of Medicine notes that attention is guided by several factors, including bottom-up salience, top-down feature guidance, scene meaning, prior search history, and the value of the target https://pmc.ncbi.nlm.nih.gov/articles/PMC9879335/. In plain terms, bright or unusual items may pull your attention first, while your chosen goal helps steer where you look next. In this puzzle, the purple gems may draw your attention because of color, but the correct differences might be tucked into quieter features such as bead spacing or a bracelet link.
That is why a relaxed scan usually beats a heroic stare. If you look only for the most dramatic change, you may miss a tiny shape edit. If you bounce around the picture, you may recheck the same shiny detail three times and leave another zone untouched. A system makes the scene smaller and fairer.
A Reliable Scan Pattern for Finding the Three Differences
Use a grid-like path from top to bottom. Begin with the left ankle bracelet, compare it with the matching area in the other image, then repeat on the right side. Next, inspect the upper sandal straps, the center chain, the bead clusters, the gem settings, the toe polish, and finally the outer edges of the feet and soles. Do not move to the next zone until you can say what matches and what does not. This keeps your attention from drifting toward the prettiest part of the picture.
Here is a practical checklist readers can use while solving the pearl sandal challenge:
- Ankle bracelets: Count beads, check spacing, and compare the shape of each hanging detail.
- Center chains: Follow the line from ankle to toe and look for a missing link, changed curve, or shifted attachment point.
- White straps: Compare strap thickness, crossings, shadows, and where each strap meets the foot.
- Pearl beads: Count repeated round shapes instead of assuming the pattern continues perfectly.
- Purple gems: Check size, outline, highlight position, and whether the gem is attached at the same angle.
- Toenails and toes: Compare polish color, nail shape, toe spacing, and small contour lines.
- Background and edges: Finish with outlines, shadows, and any decorative marks around the sandals.
If you get stuck, change the direction of your scan. People often read images in a habitual route, such as left to right or top to bottom. Reversing the path can make familiar details feel slightly new. You can also cover half of the picture with your hand or a card and compare one strip at a time. On a phone, zooming in helps only if you then move in an organized pattern; random zooming can make the puzzle feel larger instead of clearer.
Where the Differences Are Most Likely to Hide
In a pearl sandal design, the richest hiding places are repeated ornaments and symmetrical features. Beads are especially useful to a puzzle maker because a single bead can be removed, enlarged, recolored, or shifted without changing the overall sandal. Straps are another common hiding place because curves can be altered subtly. A chain link can vanish. A purple gem can be rotated. A toenail can be shorter, a highlight can move, or an ankle bracelet can gain one extra pearl.
Pay special attention to features that occur in pairs. If both feet have bracelets, both sandals have center straps, and both toes have purple polish, the puzzle can hide a difference by changing only one member of the pair. Compare left foot to left foot, right foot to right foot, then compare matching decorative elements across the two full images. The goal is not to memorize the top picture. It is to make short, direct comparisons while the details are still easy to hold in view.
Why a Checklist Works Better Than Speed
Speed can make a spot-the-difference puzzle more exciting, but it can also make it less accurate. A fast first pass is useful for obvious changes, such as a missing gem or a color swap. After that, a slower checklist is usually stronger. The APA has reported recent research on change blindness in online settings, including work in which people sometimes failed to notice even a swapped conversation partner during a video interaction https://www.apa.org/pubs/highlights/spotlight/issue-289.html. The lesson for a puzzle is humble and helpful: missing something does not mean the image is unfair. It may simply mean your attention was busy elsewhere.
Daniel Simons at the University of Illinois describes research interests that include visual cognition, attention, perception, memory, change blindness, and inattentional blindness https://psychology.illinois.edu/directory/profile/dsimons. That cluster of topics is exactly why visual puzzles feel playful but not trivial. They compress a real feature of seeing into a small challenge: we experience a rich picture, yet still need a task, a target, and a comparison strategy to notice fine detail.
How to Make the Puzzle More Fun With Others
When solving with friends or family, give everyone the same starting rule. For example, allow thirty quiet seconds for a first scan, then let each person name only one suspected difference at a time. This prevents the fastest player from blurting out everything and keeps the challenge social. If you are using the puzzle as a quick break, set a soft time limit of two minutes, then switch to hints rather than answers.
Good hints point to a zone, not to the exact change. Say “check the bracelet area” instead of “the left bracelet has one fewer bead.” A second hint can narrow the feature: “compare the round ornaments.” Only the final hint should identify the difference. This keeps the satisfying part of the puzzle, the moment of recognition, in the reader’s hands. Readers who enjoy this format may also like the site’s related Spot the Difference Puzzle, the animal-themed Can You Spot Which Dog Is Different?, and the broader visual-perception roundup 8 Optical Illusions That Challenge Self-Awareness.
What to Do When You Cannot Find the Last Difference
The last difference is usually hard because your first search has already trained you to see the image in a certain way. Reset the puzzle. Look away for a few seconds, then return with a single target category: only beads, only straps, only gems, only toenails, or only outlines. If you are viewing on a screen, reduce brightness glare and keep both images visible at once. Switching between separate tabs or screenshots can make comparison harder because you have to rely on memory rather than direct side-by-side checking.
Another useful trick is to describe each zone out loud in neutral language. “Three beads on the upper strap, one purple gem at the toe, curved white strap on the right.” When the description stops matching the other picture, you have found a candidate. This may feel slow, but it prevents the common error of seeing what you expect instead of what is actually present. It also makes the puzzle accessible to mixed-age groups because everyone can contribute one zone of careful description.
The Takeaway for the Pearl Sandal Challenge
The pearl sandal challenge is best solved by slowing the scene down. The picture wants your attention to jump toward sparkle, symmetry, and purple details, but the answer may sit in a tiny change to a bead, strap, bracelet, gem, or toenail. Work from top to bottom, compare one matching feature at a time, and mark each confirmed difference before moving on. Whether you solve it alone or share it as a friendly challenge, the fun is in proving that careful looking can beat the first impression of sameness.
Wrap-Up
The Pearl Sandal Spot-the-Difference Challenge asks readers to compare two nearly matching sandal illustrations and find three small changes. A methodical scan works best: inspect bracelets, straps, beads, gems, toes, and outlines in a fixed order. Research on visual search and change blindness supports the same practical lesson: attention is selective, so a checklist helps reveal details that a quick glance can miss.
Frequently Asked Questions
- → How many differences are in the pearl sandal challenge?
The challenge premise is to find three differences. Because the available context does not include a verified answer key, the safest approach is to use the guide as a structured solving method and confirm the final three against the exact artwork shown to readers.
- → Where should I look first in a sandal spot-the-difference puzzle?
Start with the repeated decorative areas: ankle bracelets, pearl beads, center straps, and purple gems. Repeated patterns are common hiding places because a small change can blend into the overall design.
- → Why do I keep missing an obvious difference?
Spot-the-difference puzzles rely on selective attention. Once you understand the main scene, you may stop inspecting individual details closely. Reset by scanning only one category at a time, such as beads first and straps second.
- → Is zooming in helpful?
Zooming can help if the image is small, but it works best with a plan. Keep both versions visible when possible, then move across the same zone in each image before going to the next area.
- → How can I give someone a hint without spoiling the puzzle?
Give a zone hint first, such as “look near the ankle bracelet.” If they still need help, name the feature type, such as “compare the beads.” Save the exact answer for the final hint.